Physical Address
304 North Cardinal St.
Dorchester Center, MA 02124
Physical Address
304 North Cardinal St.
Dorchester Center, MA 02124

Run DeepSeek Locally on Ubuntu to gain complete control over advanced language models without relying on cloud services. Local AI execution is becoming essential for developers, researchers, and privacy-focused users who want predictable performance, data sovereignty, and lower long-term costs.
DeepSeek offers a modern large language model that can be deployed directly on Linux systems, making it ideal for experimentation, offline workflows, and custom AI applications.
This guide walks you through everything you need from environment setup to optimization using clear steps and real-world best practices.
DeepSeek is an open-weight large language model designed for reasoning, coding assistance, and general text generation. Unlike cloud-hosted AI tools, DeepSeek allows you to run inference directly on your own hardware.
Benefits of running DeepSeek locally:
Running DeepSeek locally on Linux is especially attractive because Linux offers excellent GPU support, scripting flexibility, and performance tuning options.
Before you run DeepSeek locally on Linux, ensure your system meets the following requirements:
Minimum Requirements:
Recommended Setup:
For GPU acceleration, install the latest NVIDIA drivers and CUDA toolkit.
External reference: NVIDIA CUDA Documentation
Start by updating your system packages:
sudo apt update && sudo apt upgrade -y
Install essential dependencies:
sudo apt install python3 python3-venv python3-pip git -y
Create a virtual environment to keep dependencies isolated:
python3 -m venv deepseek-env
source deepseek-env/bin/activate
This approach keeps your Linux system clean and avoids package conflicts.
Once Python and Git are installed, you’re ready to install Ollama and manage DeepSeek. Please run the below command to install Ollama:
curl -fsSL https://ollama.com/install.sh | sh
ollama --version
🔗 External Resource :
Ollama Official Documentation – https://ollama.com/docs
Then, start Ollama and configure it to run automatically on boot.
sudo systemctl start ollama
sudo systemctl enable ollama
With Ollama installed, you can now proceed to install DeepSeek.
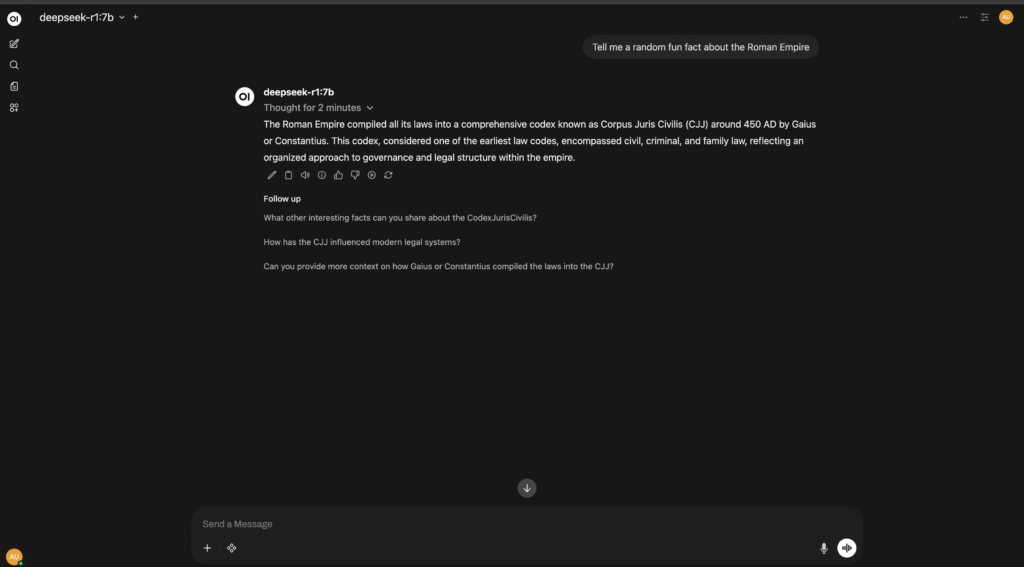
ollama run deepseek-r1:7bDepending on your internet speed this command could take some time to execute. What happens when you run it:
In short: it launches the DeepSeek R1 7B model locally using Ollama, no cloud required.
Once done you can interact with Deepseek using CLI or Ctrl + d or /bye to exit. After the model has finished downloading, verify its availability by running:
ollama listWhile Ollama lets you interact with DeepSeek from the command line, you may prefer a more user-friendly web interface. To do this, we’ll use Ollama Web UI, a lightweight web-based interface for working with Ollama models.
First, create a virtual environment to isolate your Python dependencies from the system-wide Python installation.
python3 -m venv ~/open-webui-venv
source ~/open-webui-venv/bin/activate
Now that your virtual environment is active, you can install Open WebUI using pip.
pip install open-webuiOnce installed, start the server using.
open-webui serveOpen your web browser and go to http://localhost:8080 to access the Ollama Web UI. On the login page it will ask you to create admin user by entering Name, email address and password.
In the Web UI, select the DeepSeek model from the dropdown menu to start interacting. You can ask questions, generate text, or explore any other tasks supported by DeepSeek.
You can use the UI to interact with DeepSeek just like ChatGPT.
If you want Open-WebUI to launch automatically when your Linux system boots, you can create a systemd service. This ensures the Open-WebUI server runs in the background without manual intervention.
Open a new service file with your preferred editor:
sudo vim /etc/systemd/system/open-webui.service
Then add the following configuration, making sure to replace your_username with your actual Linux username:
[Unit]
Description=Open WebUI Service
After=network.target

[Service]
User=your_username
WorkingDirectory=/home/your_username/open-webui-venv
ExecStart=/home/your_username/open-webui-venv/bin/open-webui serve
Restart=always
Environment="PATH=/home/your_username/open-webui-venv/bin:/usr/local/sbin:/usr/local/bin:/usr/sbin:/usr/bin:/sbin:/bin"

[Install]
WantedBy=multi-user.target
After saving the file, reload systemd so it recognizes the new service:
sudo systemctl daemon-reloadTo make the service start automatically on every boot, run:
sudo systemctl enable open-webui.service
sudo systemctl start open-webui.service
Check that Open-WebUI is running correctly:
sudo systemctl status open-webui.service
You should see output indicating that the service is active and running. If there are any errors, double-check the User and WorkingDirectory paths in your service file.
Using Ollama is the simplest and most reliable way to run DeepSeek locally on Linux. It removes complexity, handles model management automatically, and delivers a smooth offline AI experience directly from your terminal.
If you’re looking for privacy, speed, and full system control, Ollama + DeepSeek on Linux is a powerful combination worth adopting.