Physical Address
304 North Cardinal St.
Dorchester Center, MA 02124
Physical Address
304 North Cardinal St.
Dorchester Center, MA 02124
If you’re running your Elasticsearch deployment on Elastic Cloud, managing secure access to Kibana can quickly become a priority as teams grow. Instead of handling separate credentials or manually managing users, many organizations choose to set up SSO for Elasticsearch on Elastic Cloud to streamline authentication and centralize access control through an external identity provider.
Elastic Cloud provides built-in support for Single Sign-On, allowing you to integrate Elasticsearch and Kibana with providers like Okta, Azure AD, or other SAML– or OIDC-based systems. When you set up SSO for Elasticsearch in an Elastic Cloud deployment, users can authenticate using their existing enterprise identities while administrators maintain consistent security policies across the platform.
In this article, you’ll learn how to set up SSO for Elasticsearch on Elastic Cloud, understand the key configuration steps involved, and apply best practices to ensure a secure and seamless login experience for Kibana users, without managing authentication infrastructure yourself.
Before you begin configuring Single Sign-On, make sure you have the following in place to successfully set up SSO for Elasticsearch on Elastic Cloud:
To set up SSO for Elasticsearch on Elastic Cloud, the first step is to create a SAML-based application in Auth0. This application will act as the Identity Provider (IdP) that authenticates users before granting them access to Kibana.
Follow the steps below to create and configure the Auth0 SAML application.
Elastic Cloud Kibana SSOElastic Cloud Kibana SSO” and go to the Addons tabWhen you enable SAML2 Web App add-on it will ask for Application Callback URL. The Application Callback URL is <kibana-example-url>/api/security/saml/callback. Replace `<kibana-example-url>` with your Kibana endpoint url that you will find on the deployment page on https://cloud.elastic.co/
In the Settings section below you can also add the below JSON configuration.
{
  "logout": {
    "callback": "https://39a606a020e8419a878c028e99c840d7.us-central1.gcp.cloud.es.io/logout",
    "slo_enabled": true
  },
  "binding": "urn:oasis:names:tc:SAML:2.0:bindings:HTTP-Redirect"
}
This configuration enables SAML Single Logout (SLO) and tells Auth0 how to send SAML messages (including logout requests/responses) to Elasticsearch.
Without this, users might log out of Elasticsearch but still remain logged in at Auth0 (or vice versa). You configuration will look like below:
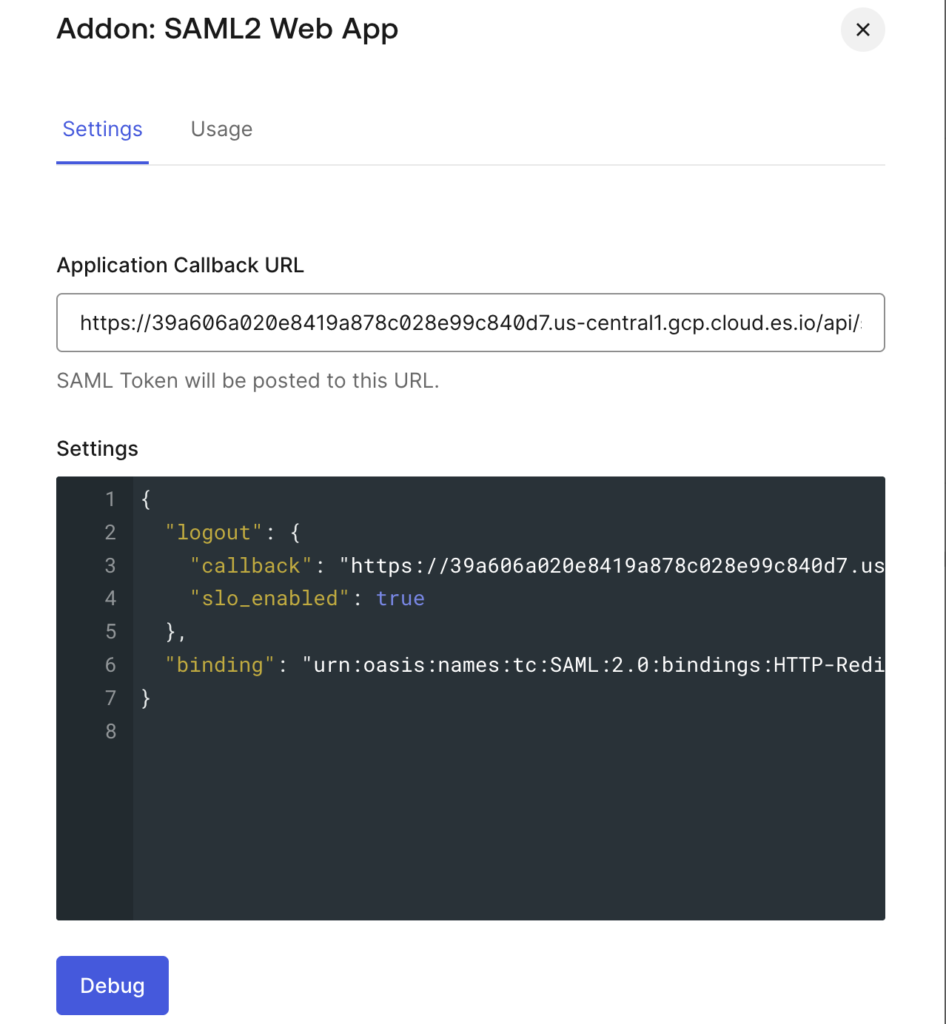
Once updated you can save the settings.
Once the Auth0 application is created you need to add the email address of the user that will be using SSO to access Kibana. To do this please verify the below:
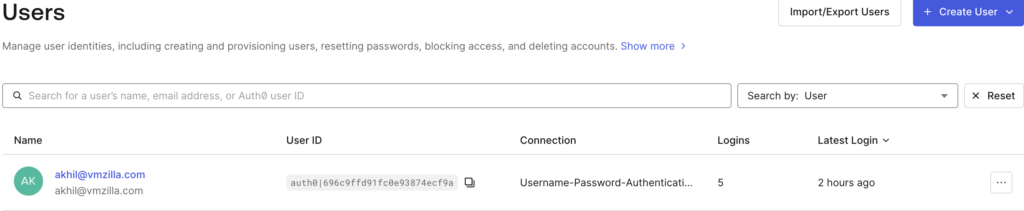
Once you add an email ID in above step, a verification email will be sent to that email ID. You need to open the email and click on this link to verify the user.
After creating the SAML application in Auth0, the next step is to configure a SAML realm in Elastic Cloud Hosted. This allows your Elasticsearch deployment to trust Auth0 as the Identity Provider (IdP) and authenticate users accessing Kibana via Single Sign-On.
Elastic Cloud manages the underlying Elasticsearch configuration for you, but it still allows SAML realms to be defined through user settings.
xpack.security.authc.realms.saml.saml1:
  order: 2
  idp.metadata.path: saml/idp-metadata.xml
  idp.entity_id: "<sso-example-url>"
  sp.entity_id:  "<kibana-example-url>"
  sp.acs: "<kibana-example-url>/api/security/saml/callback"
  sp.logout: "<kibana-example-url>/logout"
  attributes.principal: "urn:oid:0.9.2342.19200300.100.1.1"
My final settings looks like below:
xpack.security.authc.realms.saml.saml1:
  order: 2
  attributes.principal: "http://schemas.xmlsoap.org/ws/2005/05/identity/claims/emailaddress"
  idp.metadata.path: "https://dev-ethug01dkqyra1ee.us.auth0.com/samlp/metadata/na1xf2I456ntTfmE9BacMzhg1xppccB7"
  idp.entity_id: "urn:dev-ethug01dkqyra1ee.us.auth0.com"
  sp.entity_id:  "https://39a606a020e8419a878c028e99c840d7.us-central1.gcp.cloud.es.io"
  sp.acs: "https://39a606a020e8419a878c028e99c840d7.us-central1.gcp.cloud.es.io/api/security/saml/callback"
  sp.logout: "https://39a606a020e8419a878c028e99c840d7.us-central1.gcp.cloud.es.io/logout"
Key settings explained below:
xpack.security.authc.realms.saml.saml1
Defines a SAML authentication realm named saml1. This realm tells Elasticsearch to use SAML for authenticating users coming from an external Identity Provider (Auth0).
order: 2
Specifies the priority of this authentication realm. Lower number has higher priority. order: 2 means this realm is evaluated after realms with order 0 or 1 (such as native or file realms) . This allows administrators to keep local access available while enabling SAML for users
attributes.principal: "http://schemas.xmlsoap.org/ws/2005/05/identity/claims/emailaddress"
Maps the authenticated user identity from the SAML assertion to the Elasticsearch username. In this case, the user’s email address is used as the principal. This value must match an attribute sent by Auth0 in the SAML response.
idp.metadata.path: "https://dev-ethug01dkqyra1ee.us.auth0.com/samlp/metadata/na1xf2I456ntTfmE9BacMzhg1xppccB7"
You can find this URL in auth0 dashboard. You can go to Applications -> Your App -> Settings -> Scroll to bottom & click Advanced Settings -> Endpoints -> SAML Metadata URL.
Elasticsearch uses this metadata to automatically retrieve:
1. IdP signing certificates
2. Single Sign-On and Single Logout endpoints
This removes the need to manually manage certificates in Elasticsearch
idp.entity_id: "urn:dev-ethug01dkqyra1ee.us.auth0.com"
You can copy and paste the above idp.metadata.path URL in your browser to download it. You can open the file to find the value for idp.entity_id. Elasticsearch uses it to verify that SAML responses come from the correct IdP
sp.entity_id: "https://39a606a020e8419a878c028e99c840d7.us-central1.gcp.cloud.es.io"
Typically set to the Kibana base URL. Replace this with your Kibana endpoint URL.
sp.acs: "https://39a606a020e8419a878c028e99c840d7.us-central1.gcp.cloud.es.io/api/security/saml/callback"
This is the endpoint where Auth0 sends the SAML authentication response. Must be configured exactly the same in Auth0 to avoid login failures. Replace the highlighted Kibana endpoint URL with your URL.
sp.logout: "https://39a606a020e8419a878c028e99c840d7.us-central1.gcp.cloud.es.io/logout"
Specifies the Single Logout (SLO) endpoint. This allows user to logout of Kibana and terminate the SSO session. Replace the highlighted Kibana endpoint URL with your URL.
Together, these settings establish trust between Elastic Cloud and Auth0, define how users are identified, and control where authentication requests and responses flow during SSO. Correct alignment between Auth0 and Elastic Cloud values is critical—any mismatch in Entity IDs or URLs will cause SAML authentication to fail.
Once your SAML realm is configured in Elasticsearch, the next step is to connect it to Kibana. This allows users to log in to Kibana using their Auth0 credentials via Single Sign-On.
On your Elasticsearch deployment Edit page, click on “Edit user settings” in front of the Kibana instance and below settings:
xpack.security.authc.providers:
  saml.saml1:
    order: 0
    realm: "saml1"
    description: "Log in with Auth0"
    icon: "cdn.auth0.com/styleguide/1.0.0/img/badge.png"
Key settings explained below:
xpack.security.authc.providers
This is the top-level configuration in Kibana for authentication providers. It allows you to enable one or more ways for users to log in, such as:
basic → standard username/passwordsaml → Single Sign-On via a SAML IdP (like Auth0)oidc → OpenID Connectorder: 0
Specifies the priority order for this login provider on the Kibana login page. Lower numbers appear first on the login screen.
realm: "saml1"
Tells Kibana which Elasticsearch SAML realm to use for authentication. Must exactly match the realm name defined in Elasticsearch under xpack.security.authc.realms.saml.saml1.
description: "Log in with Auth0"
The label displayed on the Kibana login page next to the SSO button.
icon: "cdn.auth0.com/styleguide/1.0.0/img/badge.png"
The icon shown on the Kibana login page for this SSO provider.
Once these settings are updated please save these settings. This will take few minutes to update.
After configuring the SAML realm in Elasticsearch and connecting it to Kibana, the next step is to map SAML users or groups to Elasticsearch roles. Role mappings determine what users can see and do in Kibana.
For example, you might want your team members to have read-only access while admins get full access to dashboards and management features.
You can access Kibana and navigate to Stack Management → Security → Role Mappings to update this. Or else can navigate to “Dev Tools” in Kibana and run the below API.
PUT /_security/role_mapping/saml1
{
  "enabled": true,
   "roles": [ "kibana_admin" ],
   "rules": {
      "field": {"realm.name": "saml1" }
  }
}
The above API creates a roll mapping by the name “saml1” and assigns “kibana_admin” to it. It also checks the realm name from which the user authenticated.
After configuring the SAML realm in Elasticsearch, adding the SAML provider in Kibana, and creating role mappings, the final step is to verify that Single Sign-On (SSO) is working correctly.
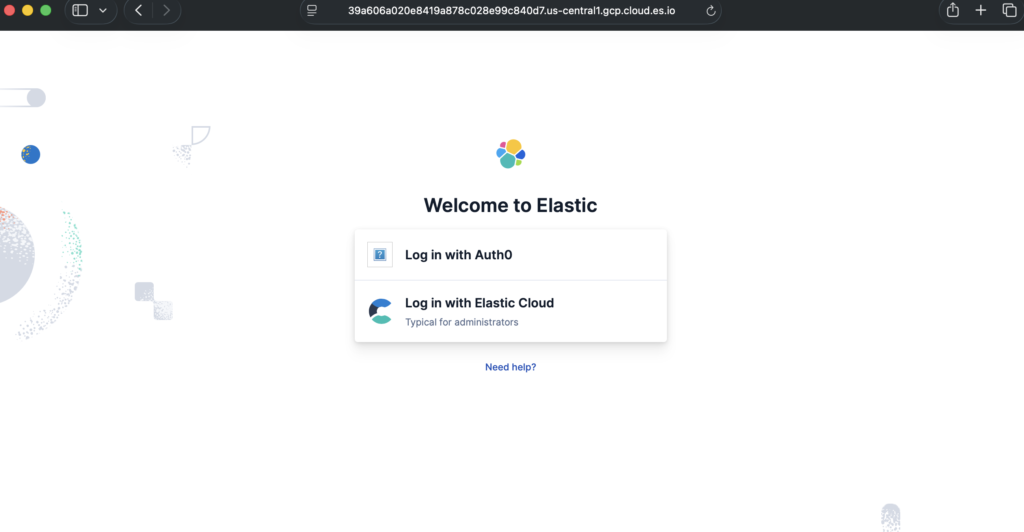
Kibana should show the Log in with Auth0 option we configured earlier. You should now be able to access Kibana using the user you have added in Auth0 user management.
If you are unable to log in then you can review the Kibana logs and the Auth0 -> Monitoring -> Logs for more details on the issue.
Setting up Single Sign-On for your Elasticsearch deployment on Elastic Cloud streamlines authentication, enhances security, and simplifies user management. By following the steps in this guide, creating a SAML application in Auth0, configuring a SAML realm in Elastic Cloud, adding the SAML provider to Kibana, and mapping users to roles, you can enable seamless, secure access for your team without managing separate credentials.
With SSO in place, users log in with their existing enterprise accounts, and administrators can centrally control access via role mappings in Elasticsearch. This not only improves security but also provides a smoother experience for Kibana users.
Implementing SSO is a key step toward professional, secure, and scalable Elastic Cloud deployments, ensuring that your observability, analytics, and search workloads are both accessible and protected.